Configuration
In the user interface portal, you can configure the Uberlogger under the
Configuration tab:

From firmware v1.3.0 on, the Configuration page is organised as a set of sub-tabs that group related settings together:
- Channels — analog/digital channel mode, range, labels, calibration
- Acquisition — sample rate, resolution, averaging, measurement mode, time sync
- Files — file format, naming, CSV options, split size
- Network — Wi-Fi hotspot, client mode and web interface login
- System — firmware info, import/export, restore defaults
The active sub-tab is remembered between page reloads in the same browser session.
Logger timestamp
The Uberlogger includes a time logging feature in the CSV data format. You can easily synchronize the Uberlogger's internal clock with the time of the PC or mobile phone you are using to access the interface.
It is important to be aware that the recorded time is stored in Coordinated Universal Time (UTC) format, without accounting for daylight saving time adjustments.
Synchronizing the time
If you would like to synchronize your Uberlogger's time with your local
PC or device you are using, click "Synchronize to local time" 
The time shown in the user interface is representing the time as the device you are using to control the user interface. The time stored in the CSV is the UTC time, so without time zone and without daylight saving time.
Automatic time synchronization (NTP)
From firmware v1.3.2 on, the Uberlogger can keep its clock correct automatically using an NTP (Network Time Protocol) server, so you no longer have to press "Synchronize to local time" by hand.
NTP only works when the Uberlogger is connected to your own network as a Wi-Fi client — in Hotspot + Client or Client mode (see Network configuration). In hotspot-only mode there is no internet connection, so automatic synchronization is not available.

The settings live on the Network sub-tab of the Configuration page:
- Automatic time sync — turn NTP on or off. It is only available in Hotspot + Client or Client mode; in hotspot-only mode (the factory default, with no network to reach) it is greyed out, so enable it after you set up a Wi-Fi client connection.
- NTP server — which time server to use. Defaults to
pool.ntp.org; you can change it to a regional pool (for examplenl.pool.ntp.org) or a server on your own network. - Sync now — request an immediate synchronization instead of waiting for the next automatic check.
- Last sync — shows when the clock was last set from the network.
Once enabled and connected, the Uberlogger synchronizes shortly after it joins the network and then re-checks about once per hour.
As with manual synchronization, the time is stored in UTC. If a recording is in progress when an NTP update arrives, the Uberlogger keeps using its current clock for that recording and applies the corrected time once logging stops, so an ongoing log is never disrupted.
Channel configuration
Sample frequency and resolution
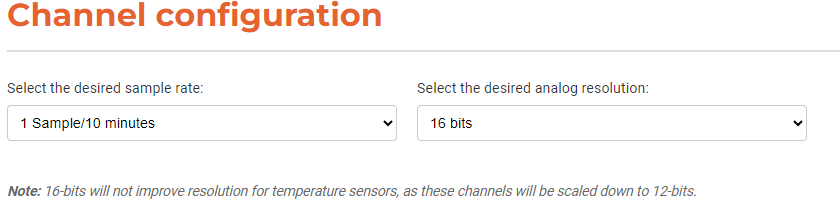
You can set the sample rate and resolution by going to "Channel
configuration" and selecting the desired sample rate and resolution. To
save the settings, click Save all settings or Save channel settings.
Sampling frequency
The Uberlogger can log input channels at sampling frequencies ranging from 1 Hz to 250 Hz.
Choosing the right sampling frequency
The appropriate sampling frequency for your measurements depends on the signal you wish to capture accurately. It is recommended to set the sample rate at least twice the maximum frequency of the signal of interest. For instance, if your signal's highest frequency is 50 Hz, logging at 100 Hz will prevent aliasing (signal distortion due to a too low sample rate).
For temperature logging, most applications can achieve satisfactory results with sampling frequencies as low as 1 Hz or 5 Hz. This ensures sufficient data points for precise temperature measurements without significantly increasing data storage requirements.
Resolution
The Uberlogger can log at 12- or 16-bit resolution.
The 16-bit resolution provides higher precision and sensitivity compared to 12-bit. This is achieved by internally oversampling the input channels and applying a first order IIR low-pass filter. This enhancement is especially advantageous when measuring small variations or fine details in signals.
When utilizing NTC sensors, it is important to be aware that the resolution for the corresponding channel will be automatically downscaled to 12-bits. This means that, even if the Uberlogger is set to 16-bit resolution for other channels, the NTC channel will operate at 12-bit resolution.
Averaging
For log frequencies below 1 Hz, you have the ability to either take the sample value at the sample rate or take the average value over the sample rate time.

Measurement mode

The UberLogger supports three measurement modes:
-
Continuous measurement: start and stop logging via the web interface or the physical button.
-
External trigger: In this mode, you first have to arm the logger by clicking the start button in the web interface or pushing the physiscal start/stop button. After this, the logger waits for an external trigger digital input to turn high to start logging and will stop the logging after the trigger pin turned low again. For each trigger a new file is made. The logger will go to idle when you press the physical or web interface start/stop button again. Note that live view is not updating when no trigger has trigged a measurement.
-
External control: Start/stop logging is controlled via a digital input. When your specified digital input is level HIGH it will start logging, taking into account the debounce time, and will stop when the level is LOW again. Each time the logger is turned on/off a new file will be made.
ImportantThe physical start / stop button and the web interface start / stop buttons are not working in external controller mode.
For external trigger and external control modes, you can choose which digital input to use for triggering or control. You can also set the debounce time to stabilize the input and reduce noise in the trigger signals. By default, the debounce time is set to 100 ms, but it can be increased to a maximum of 60,000 ms to introduce a delayed measurement. The debounce timer resets if the input drops to a low level during the debounce period, restarting the timing process.
This averaging and measurement mode functions are available from v1.2.0 and higher.
Analog & digital channels
You can set the analog channel mode and voltage range under "Analog channels" as shown below.
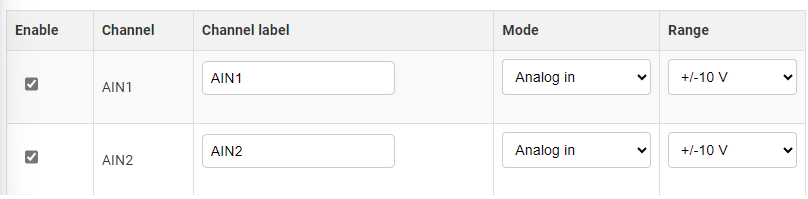
Enable channel
You can enable or disable the channel by checking the "Enable" checkbox of the channel.
Enabling/disabling channels is only available from v1.0.4 on.
Channel labels
It's possible to change the labels of the channels. A maximum lenght of 16 characters is supported. No spaces or special characters are allowed, except hyphens '-' and underscores '_'. The labels will be used in the CSVs that are created directly by the Uberlogger or using the conversion script. From firmware v1.3.3 on, the labels are also shown in the Live data viewer (value list and chart legend).
Channel labels are only available from v1.2.0 on.
Channel mode
You can select the channel mode for analog channels as either "Analog in" or "NTC" (negative temperature coefficient) temperature sensors.
Do not forget to set the red DIP switch on the Uberlogger for the channel mode when changing these settings
Voltage range
When selecting the mode "Analog in" you can also select the voltage
range +/- 10V or +/- 60V. Note that this is not possible when having
"NTC" selected. Changing the range will give you a higher accuracy when
choosing +/- 10V range or a broader range when selecting + / - 60V.
Do not forget to set the red DIP switch on the Uberlogger for the voltage range when changing these settings
Setting the channel type and voltage range switches
It is important to manually toggle the switch levers for the voltage range on the Uberlogger to the setting you set in the configuration, since this is not detected automatically. Set the DIP switches with the switches facing towards you:
-
For NTC, put the lever of the corresponding channel of the left DIP switch UP. For analog input, put the channel of the left DIP switch DOWN (off).
-
For --10V/+10V range put the lever of the corresponding channel of the right DIP switch UP (on) and for --60V/+60V set the switch DOWN (off)
To save all the settings for the channel configuration, click the "Save all settings" button.
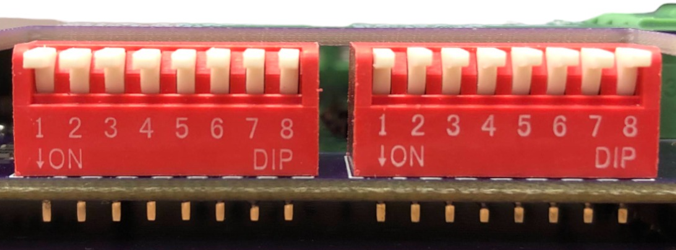
The DIP switches set the channel mode and voltage range. In this figure, all channels are set to NTC channels (left DIP switches all up) with a range of --10V/+10V (right switches all up)
Analog calibration
To make a zero-offset calibration, make sure you disconnect all the
wires from the inputs, including the temperature sensors. Note that you cannot do calibration while logging. Put all the DIP switches of the left DIP switch set to analog IN (down/ "On"). Then, click the Start calibration button under Analog Calibration, and confirm the message box that you disconnected the wires and put the DIP switches correct. A status message shown under the button will show when the calibration is
done.
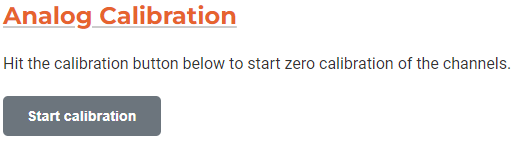
When the calibration button is pressed, the state of it is shown under it.
File options
File options are only availabe from firmware v1.0.4 on
File format
You can choose the file format you want to use for saving your data.
CSV
With this option you can directly save your data to a CSV file. In the CSV options section you can also choose which decimal and separator character you want.
Raw data
In order to reduce data, you can use the raw data logging option. This will store the data in raw bytes, after which you will need to convert the data to a CSV using the Python conversion script or the Windows conversion tool (both can be found in the Downloads section of Uberlogger.com)
File name mode
Sequential
With sequential file name mode, the log file names are written as prefix + sequence number. For example, if the prefix is "log", the file names will be "log0", "log1" etc. The Uberlogger will look for the first available sequential file name available.
When logging, existing file names will be overwritten. For example, if log1.csv does not exist, but log2.csv does, then log1.csv will be written first until the split size (see section below) is reached. Then log2.csv will be overwritten.
Timestamp
With the timestamp mode, the file name will have the form YYYYMMDD_HH-MM-ss-Prefix. For example: 20240322_15-05-10. The timestamp will be based on UTC Time that is set on the Uberlogger.
CSV options
One can adjust the decimal and separator character. The separtor character will also be taken into consideration when using the raw data conversion script or tool.
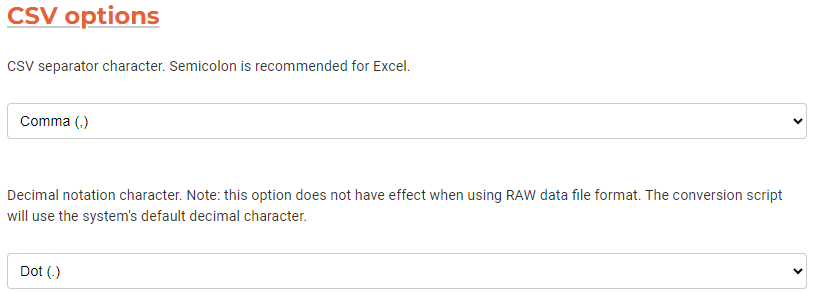
Separator character
Choose between comma (',' default) or semicolon (';'). Semicolon is recommended when using the CSVs for Excel.
Decimal notation character
Choose either dot ('.' default) or comma (','). Note: this option does not have effect when using raw data file logging.
File name and split size
By default, the Uberlogger will use your prefix for the file name and the log files will be split in parts. The size of the log file can be set from 200 KB to 2 GB.

Note that the file size is approximately the set split size and not exact.
Network configuration
The Uberlogger interface is accessed over Wi-Fi. All Wi-Fi and web interface security settings are grouped under the Network sub-tab of the Configuration page. The Uberlogger can operate in three Wi-Fi modes: hotspot mode, hotspot + client mode, and client mode only.
From firmware v1.3.2 on, changing the Wi-Fi mode and saving restarts the Uberlogger (about 10 seconds) so the new mode is applied cleanly. Because the network the device is on can change, you may need to reconnect:
- To/from Client mode only — the hotspot turns off or on, so reconnect
your computer to the right network (your own Wi-Fi, or the Uberlogger
hotspot at
http://192.168.4.1). - Staying reachable at the same address (for example Hotspot + Client saved while you are on the hotspot) — the web page detects this and reloads automatically once the device is back; otherwise it shows exactly where to reconnect.
Changing other (non-mode) settings does not restart the device.
Hotspot mode
In hotspot mode, you can connect to Uberlogger via any device with an
integrated Wi-Fi adapter and access the control panel through
<http://192.168.4.1> via your favourite web browser. Note that using
this mode will disconnect you from the internet while you are connected
to the Uberlogger hotspot. The SSID of the hotspot will be in the form of Uberlogger-XXXXXXXX and cannot be changed.
Hotspot security (WPA2/WPA3)
From firmware v1.3.0 on, the Uberlogger's own access point can be configured as either an open network or WPA2/WPA3 personal secured network.
- Open (default): No password required to connect to
Uberlogger-XXXXXXXX. Any device in range can join the hotspot. - WPA2/WPA3 personal: Pick a password of 8 to 63 characters. Clients must supply this password when joining the hotspot.
Use the security mode selector under the Network tab, set a password if
applicable, and click Save Wi-Fi settings to apply.
If you lose the hotspot password, press and hold the "mode" button for 5 seconds to reset all credentials back to defaults: open hotspot, visible (broadcast) SSID, channel 1, no client mode, and the web interface login cleared. The status LED blinks to confirm the reset.
Hide the hotspot SSID
Hiding the hotspot SSID is available from firmware v1.3.2 on.
By default the hotspot broadcasts its network name (Uberlogger-XXXXXXXX),
so it appears in the Wi-Fi network list of nearby devices. Enable Hide
hotspot network name (SSID) under the Network tab if you would rather the
hotspot not advertise itself.

When the SSID is hidden, the hotspot keeps working exactly as before, but it
no longer shows up in Wi-Fi scan lists. To connect, you must add the network
manually on your device and type the SSID (Uberlogger-XXXXXXXX) yourself.
- Hiding the SSID is a privacy/tidiness option, not a security measure — the network name can still be observed by anyone monitoring Wi-Fi traffic. Use the WPA2/WPA3 hotspot security above to actually protect the hotspot.
- After changing this setting, manually reset the logger to make it active.
- If you forget the SSID, a 5-second "mode" button press resets the hotspot to its defaults, which also makes it broadcast (visible) again.
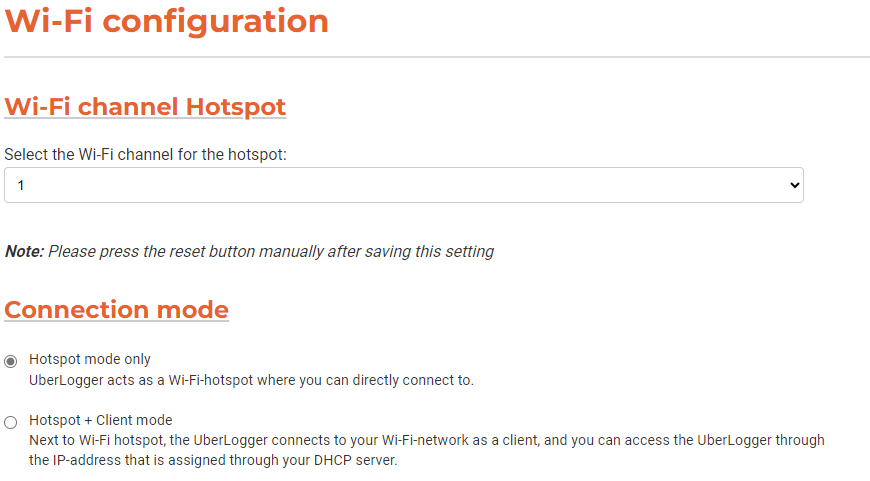
Hotspot Wi-Fi channel
If you are experiencing connection problems like a slow connection or lengthy delays, you can try to change the Wi-Fi channel. You can set the Wi-Fi channel for the hotspot, ranging from channel 1 to 13. By default, the channel is set to 1.
When changing the Wi-Fi channel, you need to manually reset the logger to make the setting active.
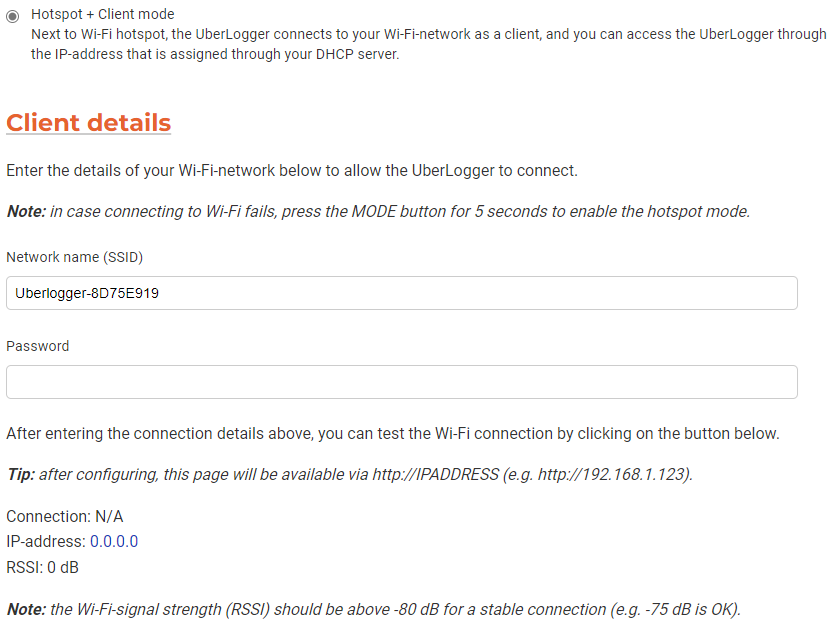
Hotspot + Client mode
In Hotspot + client mode, the Uberlogger will have its hotspot mode enabled and it can connect to another Wi-Fi network you set. Select Hotspot + Client mode and fill in the SSID of the Wi-Fi network you want to connect to:
For the client network you can choose between:
- Open network: No password needed (e.g., an open guest network without a captive portal).
- Password protected: Enter the WPA2/WPA3 personal password of the target network.
- Only 2.4 GHz networks are supported.
- Only WPA2 / WPA3 personal security is supported in addition to open networks.
- (Open) Wi-Fi networks that require a captive-portal/Wi-Fi logon are not supported.
Press the Save Wi-Fi settings button to save the Wi-Fi settings and activate the Wi-Fi mode:

In case when you are connecting to your own Wi-Fi hotspot, you will be able to access the control panel through <http://IPADDRESS>, where IPADDRESS is the address of the Uberlogger. The link will also be provided by the Uberlogger when the connection to the Access Point is
successful.
- A minimum Wi-Fi signal strength of -80 dBm is required to connect with your Wi-Fi access point
Client mode only
Client mode only is available from firmware v1.3.1 on.
In Client mode only, the Uberlogger turns its own hotspot off and only
joins the Wi-Fi network you configure, just like the client half of
Hotspot + Client mode. Use this when you want the logger permanently on
your own network and do not need the Uberlogger-XXXXXXXX hotspot. The
client network options (open or WPA2/WPA3 personal) and the 2.4 GHz-only
restriction are the same as for Hotspot + Client mode.
Because there is no hotspot in this mode, the only way to reach the device if it cannot join the configured network (wrong password, network out of range, etc.) is to press and hold the "mode" button for 5 seconds. This resets the Wi-Fi configuration back to the open hotspot defaults so you can reconnect and reconfigure.
Unable to connect to Uberlogger via access point
In case the connection fails, and you are not able to connect to your Uberlogger with your access point, try to connect directly to the Hotspot SSID described earlier. You can also press and hold the "mode" button for 5 seconds to reset the Wi-Fi mode back to Hotspot mode only.
Web interface login
Web interface login is available from firmware v1.3.0 on.
The web interface (and all REST/file-server endpoints) can optionally be protected with HTTP Basic Authentication. The setting lives under the Network sub-tab on the Configuration page.
- No login required (default): Anyone with network access to the device can use the web interface and the REST API.
- Password protected: Enable the login option and set a password.
The username is fixed as
admin; only the password is user-configurable. When enabled, the browser shows a native login dialog the first time you navigate to the device after a power cycle or after the password changes.
To enable the login:
- Open the Configuration page and switch to the Network sub-tab.
- Enable "Require login" (or equivalent toggle) and enter a password.
- Click
Saveto apply. You will be prompted to log in on the next request.
To disable the login again, simply clear the password and save.
HTTP Basic Authentication transmits the username and password in plain text, because the Uberlogger serves the interface over HTTP (not HTTPS). Treat this login as a deterrent against casual access on a shared network, not as strong protection against an attacker on the same network. Pick a password you do not reuse anywhere else.
Restore defaults
To restore the default settings of Uberlogger, click the "Restore default settings" button.
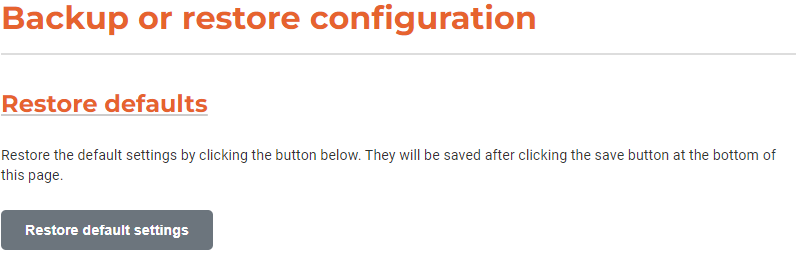
Please note that the default settings are not yet saved,
until you hit the Save all settings button:

Import/export configuration
- You can export the current settings using the "Download current settings" button. This will return a JSON file for later use.
- You can import the JSON settings file by using the "Import settings from file" button. Click on the button, select the exported JSON file and the settings will be imported.
